
Making an acrylic standee is a short chain: one piece of artwork, one acrylic sheet, one pass of UV printing, one cut, one base. Only five things move through the line. No sewing, no tooling, no complicated assembly.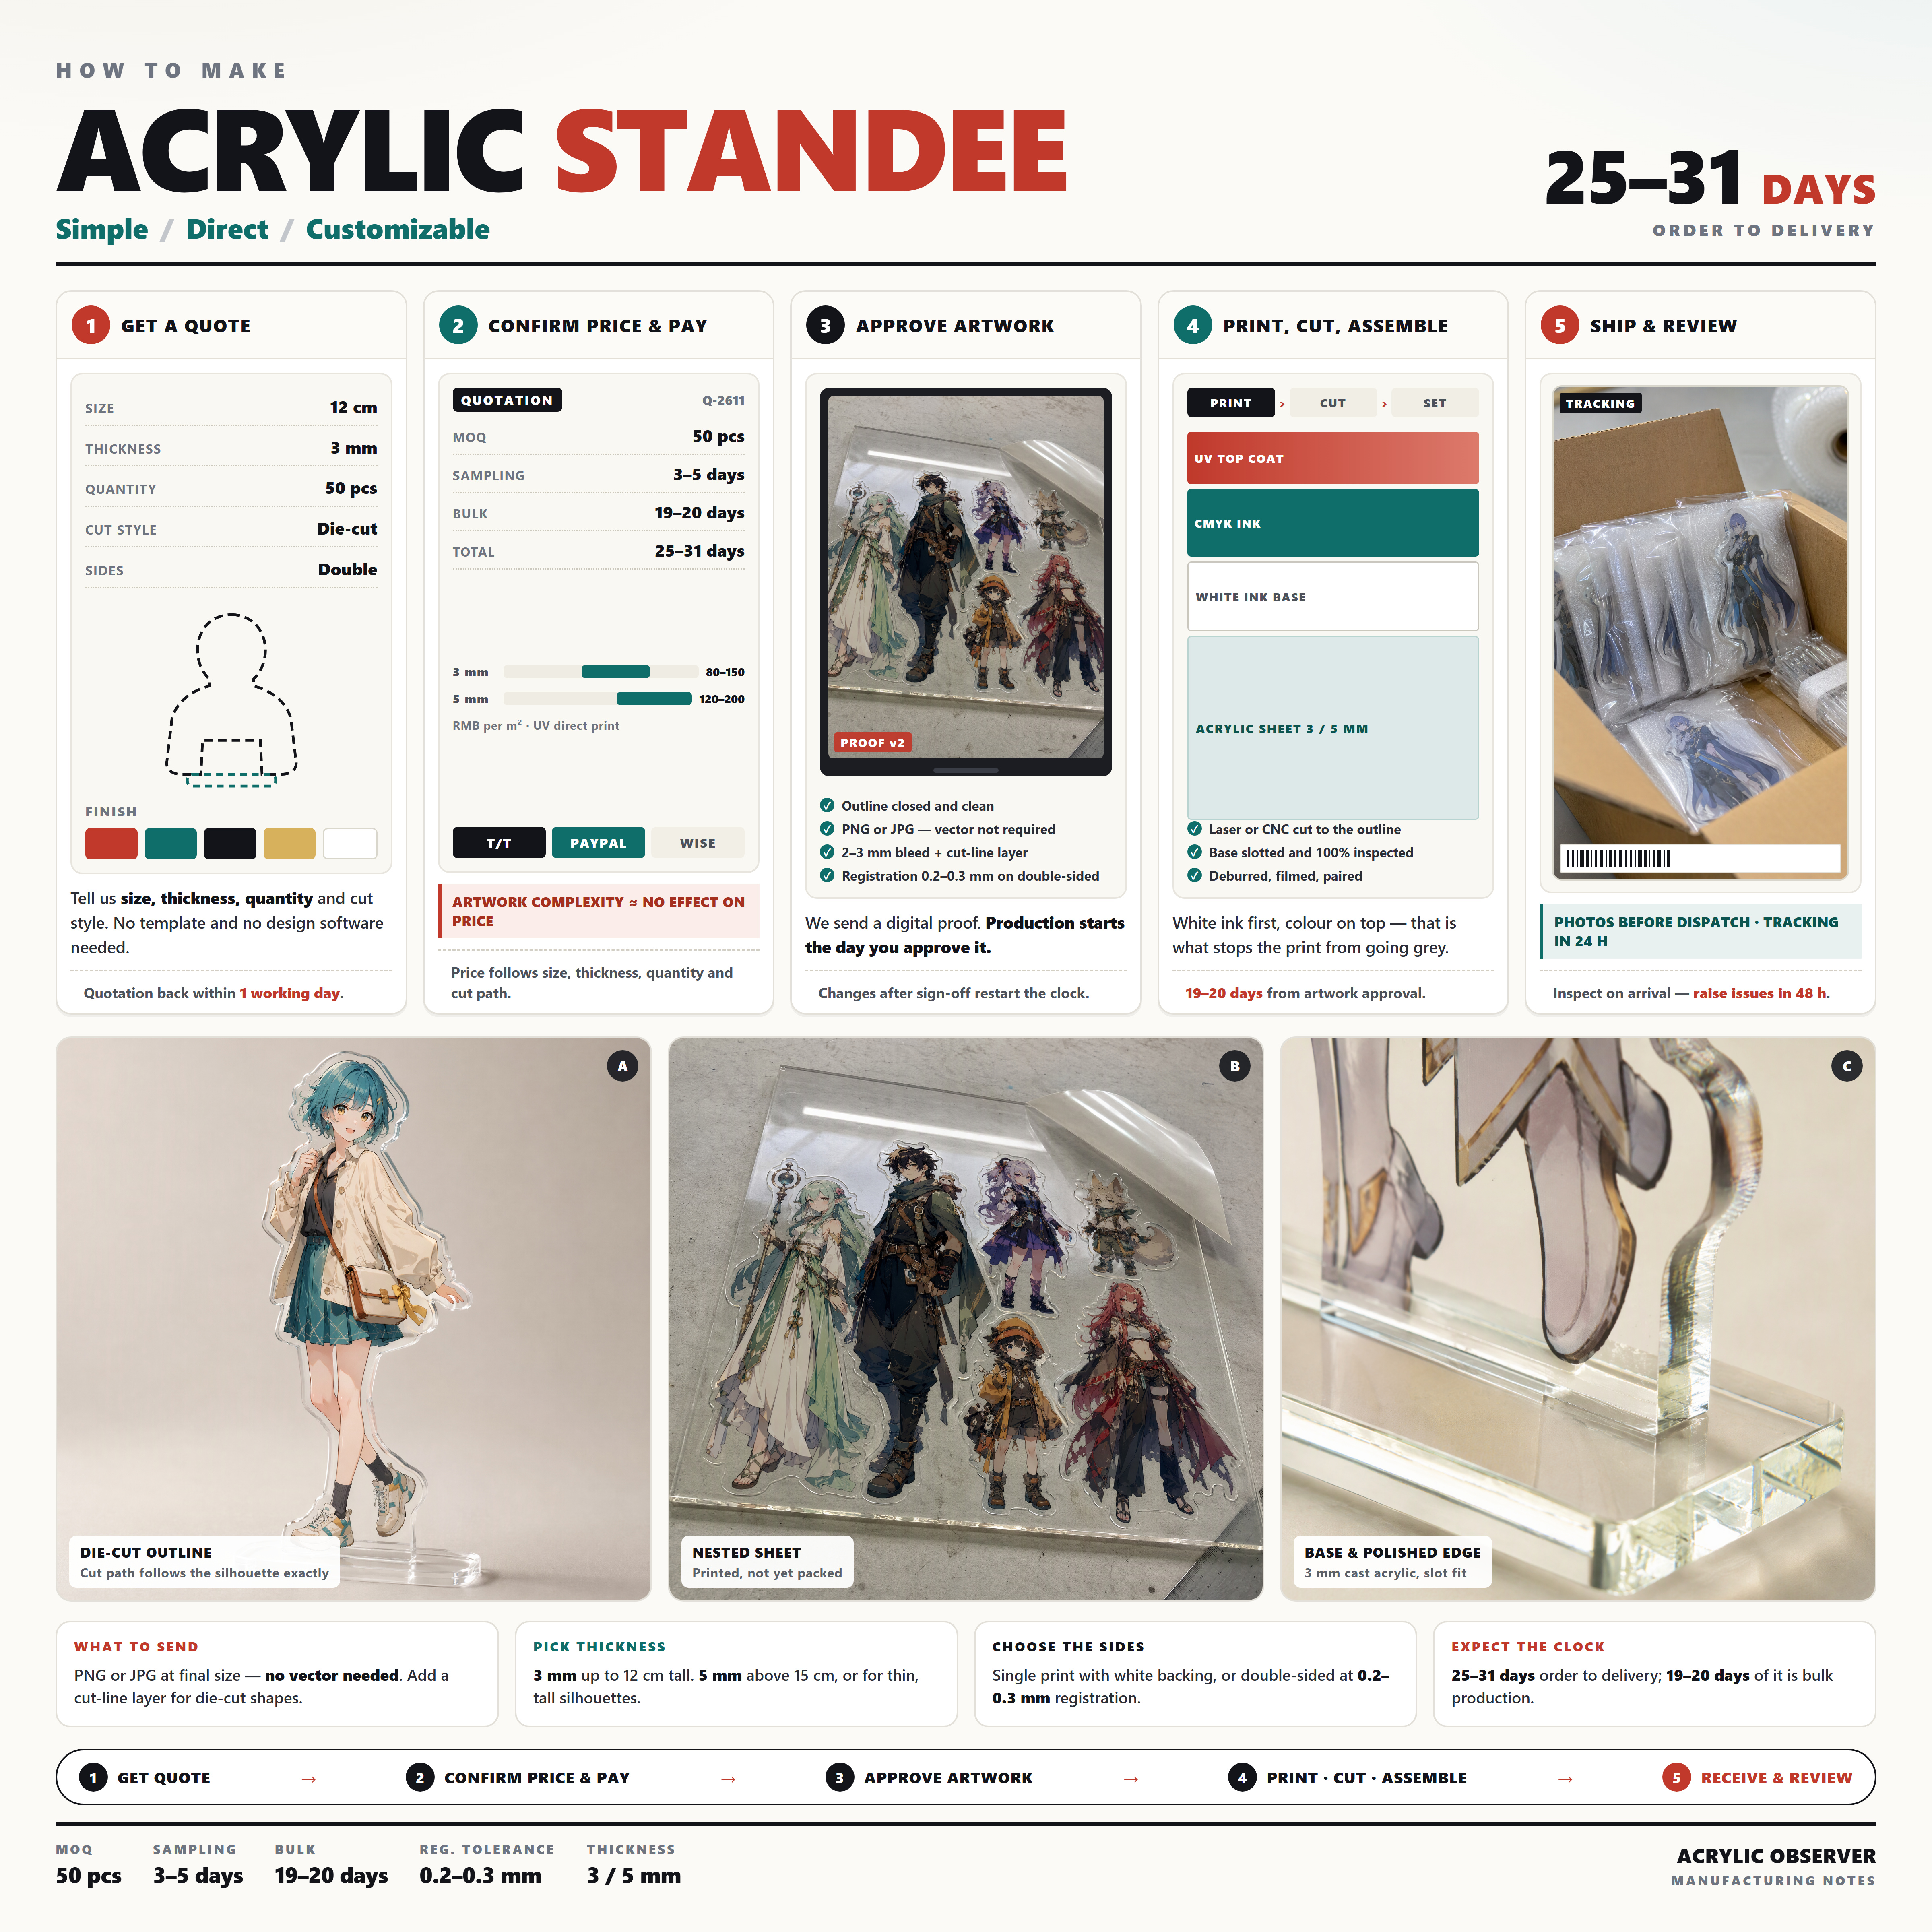
Because the chain is short, every step has very little tolerance. A two-millimetre error in the outline cuts a crooked character. One thin pass of white ink turns the whole print grey. A base that never seated properly means the customer opens the box to a flat sheet of plastic.
Below are the 13 steps in the order an order actually moves through them. Each one leads with the conclusion, then the reason. Every number here can be used to check a quotation before you place an order.
Design: the outline sets the ceiling, not the printerDesign
There are two basic formats, and they are handled differently at the design stage.
- Die-cut: the cut line follows the character's silhouette — hair, ears, a weapon, a flowing ribbon all stay. The product's outline is the artwork's outline, which is what makes it look worth the money.
- Square panel: trimmed to a rectangle or rounded rectangle with negative space inside. Simplest to produce, cheapest per unit, and well suited to badge-like compositions or matched sets.
Choosing die-cut means betting the whole product on one line. That outline has to be clean, continuous, and clearly separated from the background. If the character's edge dissolves into the background, or is blurred, glowing or semi-transparent, the cutter cannot tell where the path goes — and you get nicked corners, burrs and over-cuts.
This is not an art problem, it is a file problem. Isolating the character on its own clean layer, killing the background and checking that the path is closed costs far less than re-cutting a batch.
Artwork spec: vectors are not required, but it must stay sharp at final sizeDesign
Many buyers assume they must deliver Illustrator or CorelDRAW vectors. Not true. Acrylic is printed, not engraved, so PNG and JPG are both fine — provided the source resolution holds up at 1:1 in the actual size of the order, commonly 12 cm or 15 cm.
The test is simple: lay the artwork out at final size and look at it. If the edges are soft, hairlines break up, or gradients show stepping, it will print soft — and it will cut worse.
- Bleed and cut line: keep 2–3 mm of bleed outside the silhouette and supply the cut path on its own layer, so you do not get a white rim.
- Safety margin: keep text and logos at least 3 mm inside the outline, or cutting tolerance will clip them.
- Double-sided: supply front and back as two files, mirror the back, and mark which face is the viewing face.
- Transparent areas: knock the white ink out where you want light through. Do not fake transparency with light grey.
Design complexity barely touches acrylic — the opposite of can badges, which have to be compressed, simplified and dot-controlled. Since acrylic is printed directly, detail survives. More information in the file is almost always better, and there is no reason to delete anything for the process.
Basis: custom acrylic craft FAQ and factory order specifications, general terms as of 2026
Double-sided registration: 0.3 mm off reads as ghostingDesign
The biggest difference between a standee and a keychain is the viewing direction. A keychain only has to work from one side; a standee sits on a desk and has to work from both, which makes registration the critical metric of this step.
The method: print CMYK plus a white base on the front, the same on the back, with the acrylic sheet sandwiched in between. The two sides must align. Typical tolerance is 0.2–0.3 mm; beyond that, viewed from an angle or held against light, the two layers separate into a visible ghost.
A cheaper alternative is single-side print with a white backing coat: a complete image from the front, a flat white from the back. If the product only ever faces its audience on a desk, this is cheaper and far less exposed to registration error.
Pricing: size and thickness set the price, complexity barely moves itQuote
This is the most counter-intuitive thing about acrylic, and the most useful: a more complicated drawing usually costs the same. Cost sits in sheet area, sheet thickness, printed area and cut-path length — not in how many strands of hair the character has.
Reference ranges (RMB, UV direct print included, special finishes and tooling excluded):
| Item | Typical value | Effect on unit price |
|---|---|---|
| Sheet thickness | 3 mm / 5 mm | 3 mm UV sheet ≈ RMB 80–150 per m²; 5 mm ≈ RMB 120–200 per m² |
| Finished size | 8 / 12 / 15 cm | Scales with area — double the size, roughly four times the area |
| MOQ | 50 pcs | Standard threshold 50 pcs; below that it needs gang-run sheeting plus a setup fee |
| Print sides | Single / double | Double-sided adds roughly 40–60% print labour |
| Cutting | Die-cut / square | Die-cut is charged by path length; complex outlines cost more |
| Artwork complexity | Any | No measurable effect on price |
So when you negotiate, negotiate size, thickness, quantity and cutting method — not “my drawing was hard, can it be cheaper”.
Sampling: 3–5 days to lock down two things — colour and thicknessSampling
A pre-production sample is not a formality. On acrylic only two things really go wrong: the colour is off, or the thickness is wrong. RGB on screen shifts once it lands on acrylic, because of the white ink base and the refraction through the sheet — large gradients, deep skin tones and metallics suffer most.
- Lead time: typically 3–5 days; die-cut and double-sided work takes the upper end.
- What to sign off: colour against the file, sheet thickness and clarity, whether the cut follows the character, and how tight the base slot is.
- Never judge from photos: white ink opacity and the polish on a cut edge can only be judged in hand. The sample has to be couriered to you.
Once the sample is signed, that version becomes the golden sample for bulk. Any later artwork change means re-approval — and the clock restarts from the new sign-off date.
Sheet selection: 3 mm is the default, 5 mm answers “will it bend”Production
Acrylic (PMMA) comes as cast or extruded sheet, and as clear, opal, coloured, mirrored or matte stock. Standees almost always use clear cast sheet with white printed on the reverse: cast sheet transmits light more evenly and cuts with a cleaner, clearer edge than extruded, which tends to look hazy.
Thickness is not about looking premium — it is about height and base:
3 mm: up to 12 cm tall with a standard base. The best balance of cost and weight, and the default for most merchandise.5 mm: panels above 15 cm, thin-and-tall proportions (a spear, a wing), or products where visible heft is part of the value.
Below that: under 2 mm, stress cracks appear at the slot and the edge chips after a few insertions — not advisable for anything that gets assembled and taken apart.
At the cutting stage, grain direction and protective-film orientation must be marked consistently across the nesting plan, or one batch will show mismatched reflections and colour shift from different angles.
UV printing: the white ink base decides whether the colour goes greyProcess
Acrylic is transparent. To get opaque, saturated colour on clear sheet you must first lay down a white ink base, then print CMYK on top of it. This is what “white base plus colour overprint” means.
White ink opacity drives the final look: if the white is thin or uneven, colour picks up whatever is behind the sheet — red turns pink, deep blue turns purple, pale tints almost disappear. That is exactly why samples have to be judged in hand; none of this is visible on screen.
UV printing works by jetting UV ink onto the sheet and curing it instantly with ultraviolet light. The benefit is that nothing has to dry: the ink sets in seconds, which gives sharp, saturated blocks and edges that will not smear during cutting.
| Dimension | UV direct | Screen printing |
|---|---|---|
| Minimum order | Low — workable from 50 pcs | High — usually hundreds to amortise screen setup |
| Gradients and detail | Gradients, hairlines and small type all reproduce | Built for spot-colour blocks; gradients are limited |
| Cost of an artwork change | Change the file, no plate cost | Every colour needs a new screen |
| Ink body | Thin, flat layer | Thicker, stronger opacity |
| Best for | Small runs, many SKUs, illustrated merchandise | Single design at high volume, flat logo work |
Surface finishing: UV coating is standard, the effects are the upchargeProcess
After printing, the surface receives a UV protective coat. It does three jobs: resists scratching, slows UV-driven ageing, and seals the ink underneath. Without it, a standee picks up scuffs after a few trips in a bag against keys and a hardcover notebook — and colour fades with sun exposure.
Effects can be layered on top, and these are the lines itemised on a quotation:
Spot UV / gloss varnish: highlight only the character or a glowing element to create contrast in texture.Matte / fine sand: overall low sheen, less reflection, and no white hotspots when photographed.
Foil / holographic: requires a separate plate or transfer; the unit price rises noticeably, and flash at die-cut edges is common — always check it on a sample.
Glitter / pearl: common on support-style products, but assess how the powder affects white ink opacity.
The real cost of special effects is longer lead time and a higher defect rate, which is why they carry real weight in the price model (see Fig. 2). On a tight budget, money spent on size and thickness buys more than money spent on foil.
Cutting: laser is fast but yellows the edge, CNC is slow but cleanProcess
The printed sheet is now cut into individual standees along the cut path. The two mainstream methods trade off differently:
| Dimension | Laser | CNC |
|---|---|---|
| Cut edge | Slightly yellowed or scorched; needs polishing | Flat and clear, close to the original sheet |
| Precision | High; handles narrow outlines well | High; rounder corners and cleaner internal cut-outs |
| Speed and cost | Fast, lower unit cost | Slow, higher unit cost |
| Heat effect | Yes — artwork near the edge needs clearance | Essentially none |
| Best for | Standard die-cut shapes, larger volumes | Higher-value products where edge clarity matters |
The heat-affected zone is the detail most easily missed on this line: if colour runs right to the outline, cutting leaves a faint yellow-brown band along the edge. There are two ways around it — keep 1–2 mm of clear margin, or switch to CNC. Check this specifically on the sample and you avoid re-running a whole batch.
After cutting comes deburring, peeling the protective film, and rejecting chipped or mis-registered pieces. Die-cut work has a visibly higher reject rate at this step than square panels, because the longer the path, the more chances for a nick.
Structure: a slot-in base is the cheapest answer, magnets and rotation are the premiumProcess
A standee stands because of the piece of acrylic underneath it. Ordered by complexity, there are four common approaches:
Flat base with slot (most common): a slot in the bottom of the body, a matching slot in the base, the two cross-joined. Cheapest, but sensitive to slot tolerance — too wide and it wobbles, too tight and it will not seat, or it cracks.Bonded base: the base is glued to the body with acrylic cement. Most stable, but it cannot be dismantled and shipping volume grows.
Magnetic: a magnet set into the base, so the body can be swapped at will — good for “one base, several characters” play. Cost and process difficulty both rise.
Rotating / shaker: the body rotates on an axis, or encloses liquid and glitter. A display-grade product at a higher price point, and it needs extra assembly and durability testing.
Slot tightness should be fixed at the sampling stage, and verified with a simple test: insert and remove 20 times in a row. A lot of after-sales complaints are not about printing at all — the thing cracked on the second insertion.
Assembly and QC: inspect everything before the base goes onAssembly
Assembly itself is simple — peel the film, pair the parts, seat the base. Its real value is that this is the only point in the chain where you see every finished unit, so full inspection belongs here, not in the customer's complaint email.
A workable pre-shipment checklist:
Appearance: no scratches, fingerprints, bubbles, or dust trapped under the ink.Colour: against the golden sample, with attention to white ink opacity and banding in large gradients.
Outline: no chips, no missing corners, no uncut sections; check that the cut follows the character.
Registration: front-to-back offset on double-sided units under 0.3 mm.
Structure: the base seats smoothly without wobble; no cracks at the slot; consistent magnet pull.
Quantity and pairing: one base per body, and no mixed characters in multi-character orders.
An AQL sample plus 100% inspection of critical items is the practical combination: appearance by sample, registration and structure in full. When a systemic defect appears — one colour's white ink running thin across the batch, say — stopping the line that day costs an order of magnitude less than a recall after shipping.
Shipping: 25–31 days from order to deliveryShipping
The argument on this number is almost always about where it starts. What the customer actually cares about is “when will it arrive”, so the quote we give is the whole order: 25–31 days from order to customer delivery.
Broken down, those 25–31 days are four segments: artwork and quote 1–2 days, sampling 3–5 days, bulk production about 19–20 days, packing and shipping 2–4 days. Add the low ends and you get exactly 25 days; add the high ends and you get exactly 31. The ranges reconcile, so the quotation and the actual schedule stop contradicting each other.
One internal detail has to be stated clearly: the 19–20 days of bulk production start from the day the customer approves the artwork (or the sample), not from the day the order was placed. The 25–31 day window does not change, but the longer artwork revisions drag on, the thinner the margin left for production and logistics — and a change that requires a new sample will push straight through the window.
Put the four stages on one line and an order looks like this:
Shipping itself involves four actions, and skipping any one of them becomes an after-sales case:
Photo confirmation before dispatch: one flat-lay of the whole batch plus front and back of a sampled unit, sent with the shipping notice, so both sides share a reference.Address verification: recipient, phone, address and postcode double-checked before dispatch; cross-border orders also need the declared description and value agreed.
Packing method: each body in its own OPP bag with EPE foam or air column; bases packed separately from bodies so they cannot strike each other in transit and crack; corner protectors inside the carton.
Tracking: tracking number within 24 hours of dispatch; for export orders, customs documents go out with it, not after the shipment is already held.
For custom orders shipped to individuals, discreet packaging is confirmed at this point too: no artwork or character name on the outside, no product description on the waybill. For high-value IP and adult-adjacent categories this is a requirement, not an option.
Receiving and after-sales: three checks, raise issues within 48 hoursShipping
Unpack and inspect the day the goods arrive — not after they have been listed or forwarded. There are only three things to check:
Quantity and pairing: every body with its base, and no mixed characters in multi-character orders.Damage: chipped corners, surface scratches, cracked slots. These are usually transport-related, so keep photographs of the carton and cushioning.
Colour and registration: compare with the physical golden sample, not with a screenshot. The screen is not the acceptance standard; the signed sample is.
The industry convention is to raise exceptions within 48 hours of delivery; past that, factories typically only supply replacements at cost. Systemic problems — one colour shifted, one position off across the run — should be reported as a batch issue rather than a handful of replacements, because the cause is in the process, and replacements will not fix the next batch.
One last point that is not about process but matters just as much: acrylic is maintained by avoiding light, avoiding abrasion, and wiping dry. Direct sunlight over time accelerates yellowing of both sheet and ink; clean only with a soft dry cloth, never water, alcohol or spray cleaner; and handle the piece by the base, not by the character. Get that right and a 3 mm standee keeps its colour for three to five years.
The whole chain, in one line
That is the full chain an acrylic standee travels, from one artwork file to the customer's hands. What decides the outcome was never the equipment, but three very plain things: a clean outline, enough white ink, and packaging that holds up.
If you are preparing a standee and are unsure whether your artwork can be cut directly, or want to know where your size and quantity land on price, send the file over — we will walk the steps above one by one and quote only after confirming it can be made.
Have a specific file or order to assess? Send the artwork, finished size, quantity and target date, and you will get a feasibility judgement and pricing within one working day.